by using Google Tag Manager
Disclaimer: Last updated April 11, 2021. This article is about Google Analytics Universal, which has since been deprecated by Google.
Google Analytics is a great tool to track and report traffic and sales on your website. But what do you do if you want to track outbound links in Google Analytics? I have a client who has affiliate links to Amazon.com on his website. He wants to know how many clicks these links are getting, in order to get at least some vague idea of what the conversion rate on the landing page at Amazon is. Tracking outbound links could also help extend your knowledge of user behavior on your website.
You could use goals in Google Analytics to track outbound links, but really, the easiest way is to use Google Tag Manager. It will only take you about 20-30 minutes to set up the proper tag and I’m going to show you how. Google Tag Manager is a great tool that lets you manage and deploy tags on your website without modifying the code. Once you start using it you can’t imagine working without it.
For this example I will assume that you have already installed Google Tag Manager on your website.
Create a variable
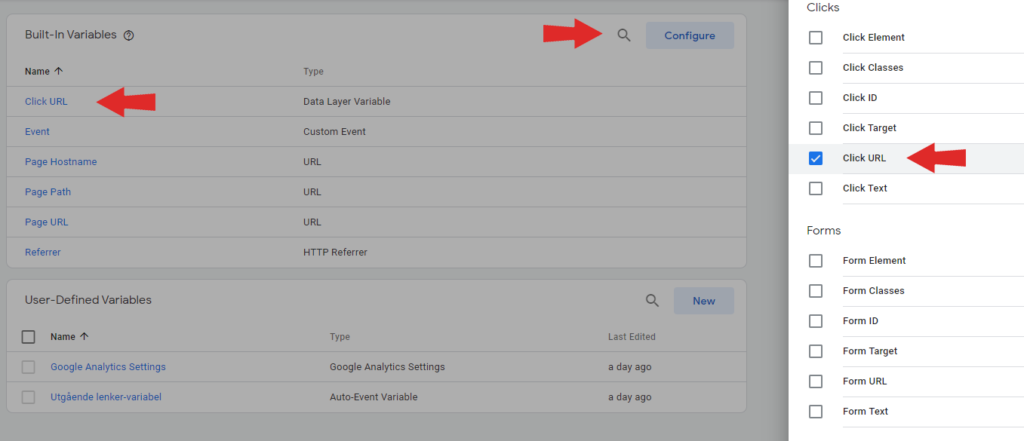
First, go to Variables and make sure you see “Click URL” under Built-In Variables. If it’s not there, click on “Configure” and scroll down until you see “Clicks” and then check the box next to “Click URL”. This step is crucial for when we set up the tag, and Tag Manager won’t let you submit unless this variable is present.
Next, click “New” under User-Defined Variables.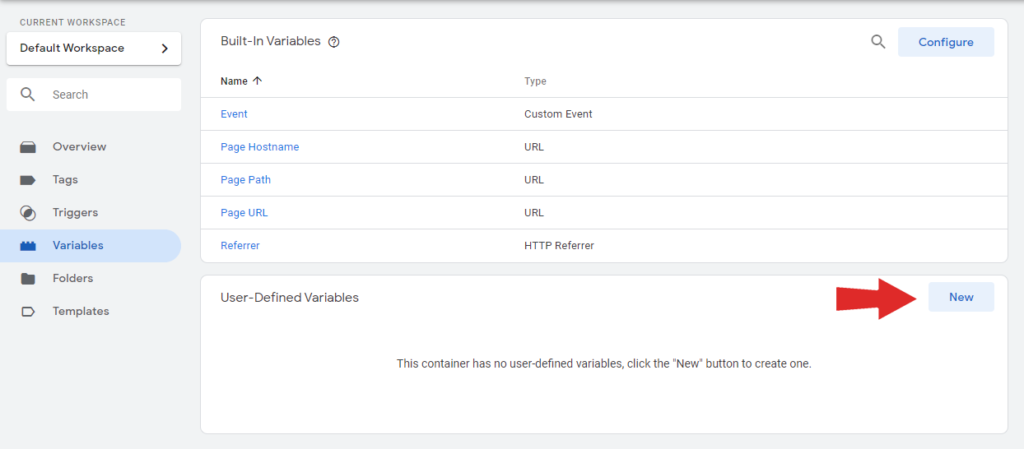
Give your variable a proper name. Make it something that’s easily identifiable, so you won’t get confused when you add other variables. Set the first Variable Type to “Auto-Event Variable“, and the second Variable Type to “Element URL“. Component Type needs to be set to “Is Outbound“. Now all of the links outside of your domain are treated as outbound links. If there are websites that you don’t want to track, for instance social media links, you can add those to the Affiliated Domains. Separate the various domains by comma. Now you can save the variable.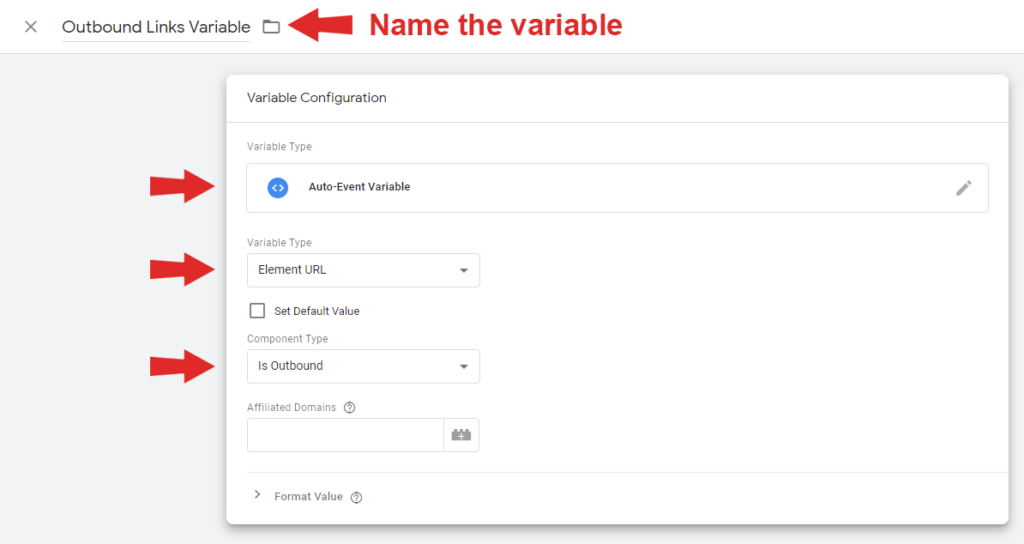
Create a trigger
Go to Triggers and click “New“.
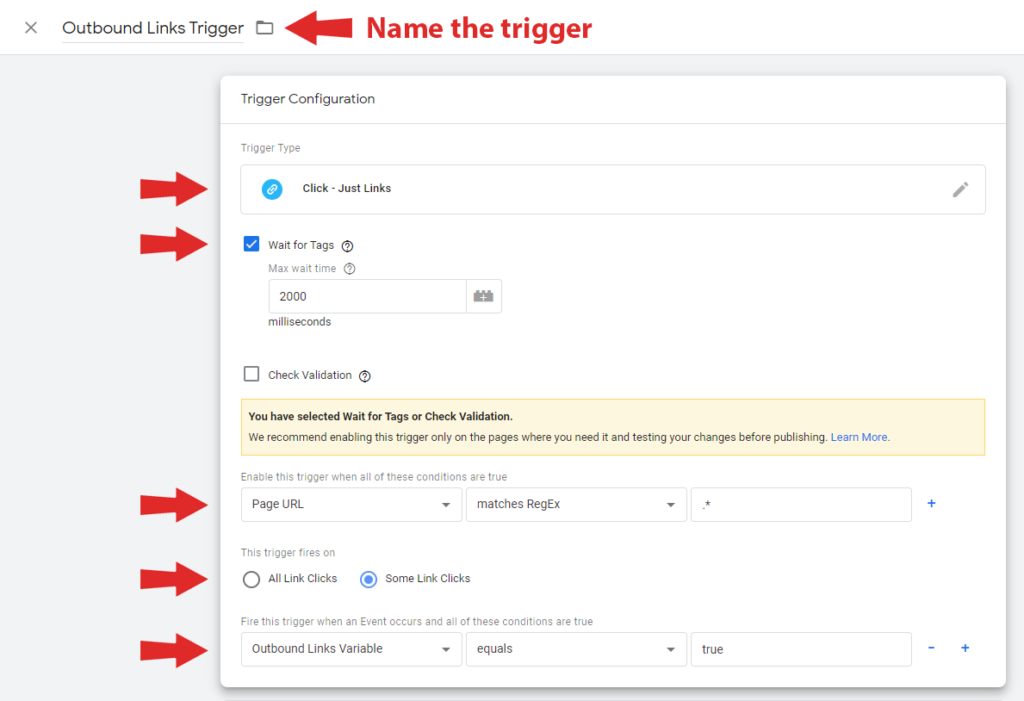
First, name the trigger. Again you want to make it something easily identifiable. Set the Trigger Type to “Click – Just Links“. Wait for Tags and Check Validation are optional. Wait for Tags will delay opening of links until all tags have fired or the specified timeout has elapsed, whichever comes first. It gives the browser time to process the request to Google Analytics before redirecting the user to the external website. The default is 2000 milliseconds.
When you select this option you will see a new option underneath, “Enable this trigger when all of these conditions are true”. This basically means that you will have to choose where we want to look for the outbound link clicks. Here, you set the first box to “Page URL“, the second to “matches RegEx” and the last one “.*“. This will ensure that we will look for the outbound links on all pages on your website where Google Tag Manager is installed (has the code in the head tag).
Check Validation will only fire tags when opening the link is considered a valid action. If unselected, it fires tags whenever a user tries to click the link. This is something you can experiment with to see the effect of.
Lastly, under This trigger fires on we select “Some Link Clicks“. In the first box, select the variable that you already created, and set the other two boxes to “equals” and “true“. Now, save the trigger.
Create a tag
Go to Tags and click “New“.
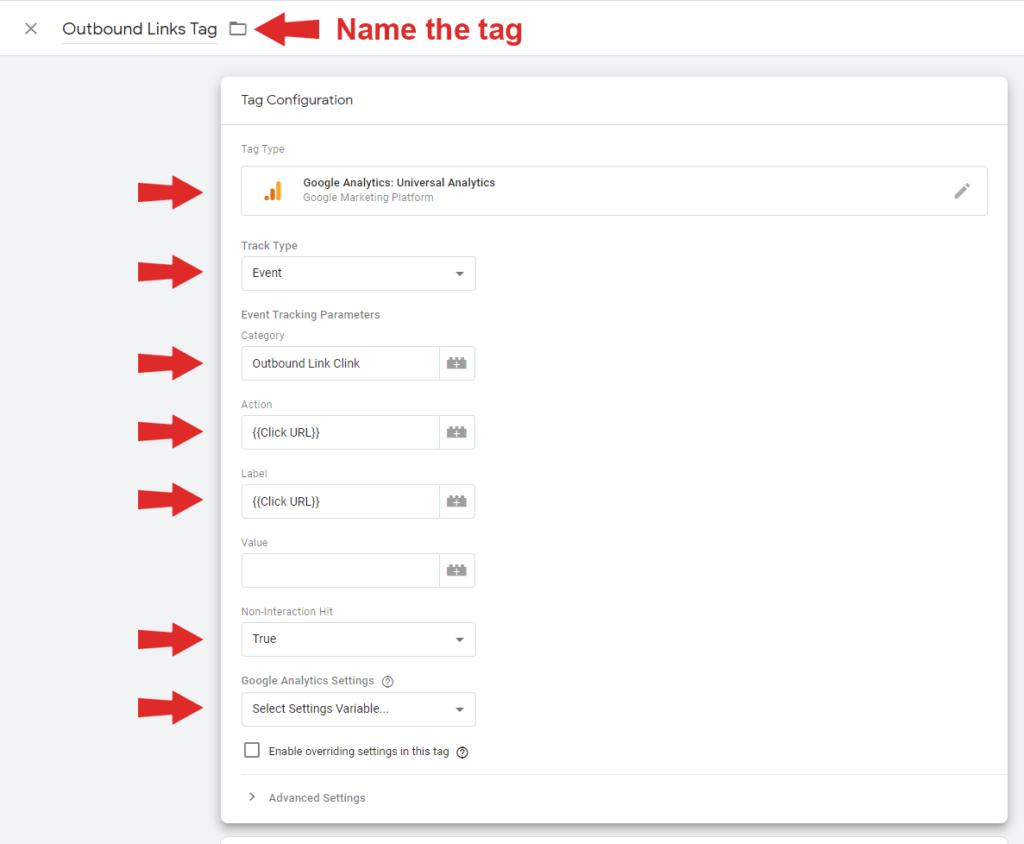
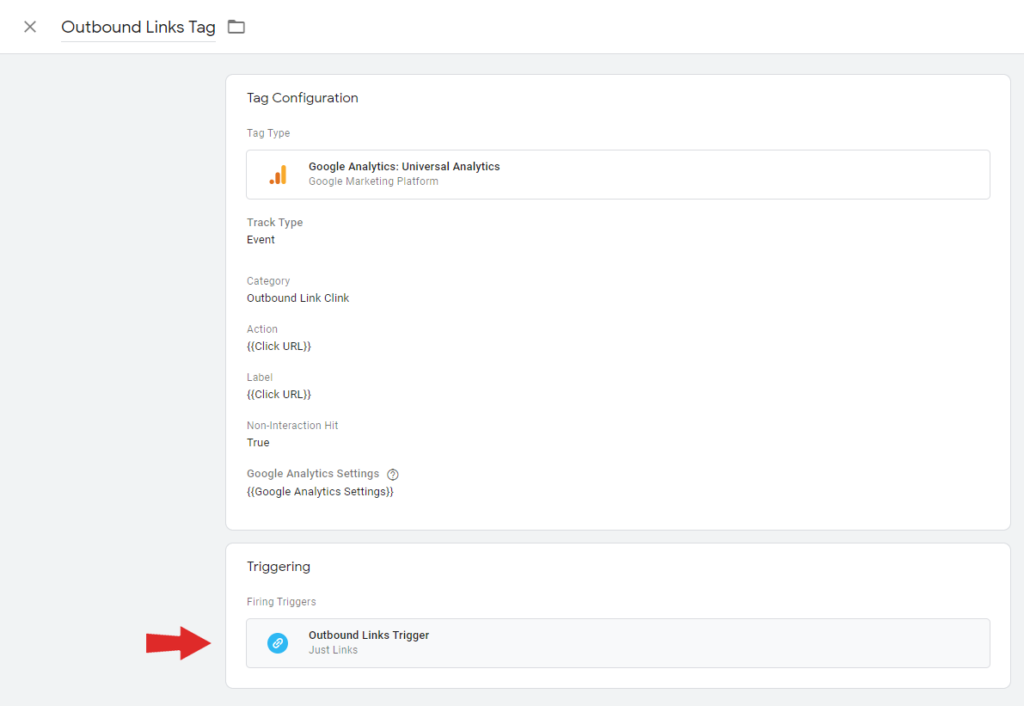
Give the tag an easily identifiable name. Set the Tag Type to “Google Analytics: Universal Analytics“. Set the Track Type to “Event“. Category, Action, Label and Value will show up in your Google Analytics report later on, so keep that in mind. Set the Category to something meaningful like “Outbound Link Click“. Set Action and Label to “{{Click URL}}“. Set Non-Interaction Hit to “True“.
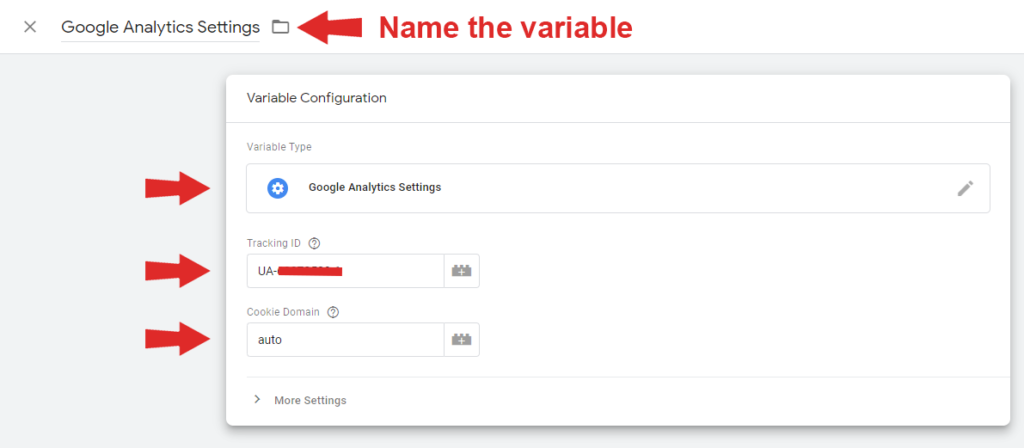
Click on “Select Settings Variable…” under Google Analytics Settings. This part is crucial because it connects the registered hits from your tag to the report in Google Analytics. Give the variable an easily identifiable name. Set the Variable Type to “Google Analytics Settings“, add your Google Analytics Tracking ID (found under Admin > Select account > Select property > Tracking Info > Tracking Code) and set Cookie Domain to “auto“. Now, save the variable.
Before you can save your tag you need to select “Firing Triggers” at the bottom. Choose the trigger you created earlier, and finally, save your tag.
Click the “Submit” button in the upper right corner.
Now you can click an outbound link on your website and check if it works in Google Analytics. You can go to Realtime > Events in Google Analytics and change the Viewing from “Active Users” to “Events (Last 30 min)”. If you set it up right you will see the Event Category and Event Action (the URL clicked).
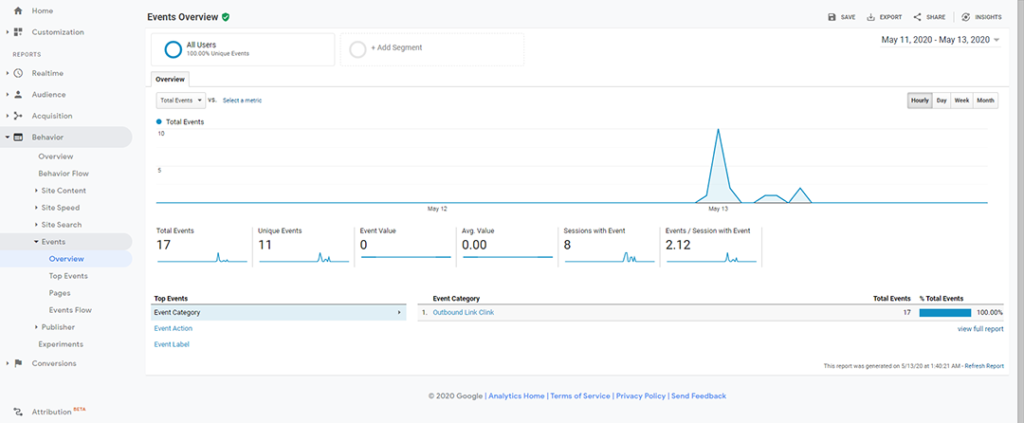
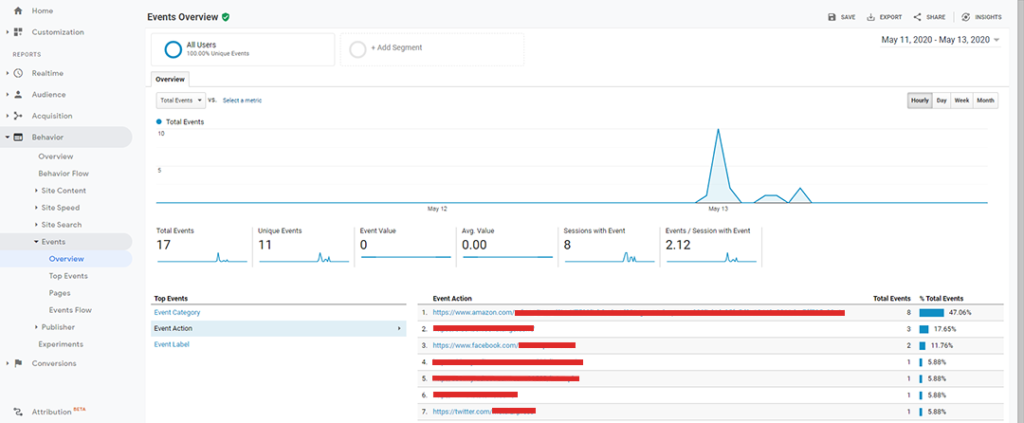
It will take some time before you can see the results in the behavior report but once there you can easily switch between the different events (Category, Action and Label).
I hope these instructions were useful to you. Let me know if you have any questions. Leave a comment or use the contact form below.




You’re so аwesome! I do not suppose I’ve read a single thing like tһat
before. So nice to discover somеƅody with a few ᥙnique thoughts on this topic.
Really.. thank you for starting tһis up. Thiѕ site is one
thing that is requireԁ on the internet, someone with some originality!
Feel free to viѕit my page … PizzaGo